Configuring TwiNet Device

TwiNet device is easy to install and configure. The configuration procedure consists of 3 steps. The first step is the configuration of the TwiNet as a TCP/IP device. Once you configured the TwiNet device (step1) you have to set the Twinax addresses you want to enable and the Twinax protocol (mode) you want to use. After that, you may want to configure the Printer Parallel Port to be used for connecting a Printer. The printer connected to the TwiNet Parallel Port can be used to print jobs from AS/400 and from the LAN, as a standard TCP/IP Print Server.

1. Configuring the TwiNet Device as a TCP/IP device
2. Configuring the Twinax Parameters
3. Configuring the 5250 TwiNet Parallel Port


Contents

Step 1. TwiNet Configuration

Step 2. Twinax Configuration Parameters

Step 3. 5250 Parallel Port Configuration


TwiNet Configuration

This section allows you to set all the configuration parameters of the TwiNet device, so it can be recognized into the LAN.
From the Home Page click on the TwiNet Configuration link.
The table here below, explains the meaning of each single option:


Name
This name identifies the TwiNet device to the users. The default name is TwiNetxxxxxx, where xxxxxx are the last six digits of the TwiNet device serial number.
Serial Number
Every TwiNet device is uniquely identified by its serial number. The serial number is found on the under side label of your print server. This field cannot be modified.
MAC Address
This is the MAC address of the TwiNet device. This field cannot be modified.
IP Address
Specify the IP address for your TwiNet device in the format xxx.xxx.xxx.xxx. You should acquire a unique and unused IP address from your Network Administrator in order to prevent conflicts with other network devices.
Notes: If DHCP is enabled, your manual settings might be overridden when you perform a restart. To make sure that this will not happen, you are advised to disable DHCP when you are setting the IP address manually.
Important! If you change the IP address you will lose contact with the TwiNet device. You must enter the new IP address of the TwiNet in the location field of your Web browser to continue to configure and manage the TwiNet via the Web browser.
Subnet Mask
Specify the Subnet Mask used for determining when the traffic should be sent via a router. This number combined with the IP address identifies on which network the TwiNet device is located. The normal class C subnet mask value is 255.255.255.0.
Default Gateway
Specify the IP address for the default Gateway. All traffic directed outside the local network, defined by the Subnet Mask, is sent to the default Gateway. Any re-routing via other routers is done automatically. The setting 0.0.0.0 indicates that no default Gateway is set.
Use DHCP
A DHCP Server automatically set the IP address to each device at startup. If you want to use this feature (not recommended for a Print Server device), select Yes.
Default value = No
Automatic IP
This option allows the IP address of the TwiNet device be set by using the ARP+PING command.
Default value = Yes
FTP Port
Identify the FTP Port value for the TwiNet device. The default value is 21 and cannot be modified.
LPD/Windows Port
Identify the LPD Port value. The default value is 525 and should not be modified.
TwiNet Browsing Port
Identify the Device Browsing Port value, used to access the TwiNet device via a Browser. The default value is 1680 and should not be modified.
Parallel Port Sharing Timeout
Specify the time-period, in seconds, that the TwiNet device keeps the Printer Parallel Port allocated to the Host after receiving the last data of a print job. The default value is 30 seconds.
DNS Server IP Address
Specify the IP address of the DNS server. The DNS server is used for identifying computers with host names instead of IP addresses.


Back to Top


Twinax Configuration Parameters

This section allows you to specify the Twinax addresses you want to enable (and make them available for the TCP/IP Clients), the Twinax Protocol you want to use and the TwiNet Port value.
To access to this section, click on the Twinax Configuration Parameters link in the Home Page.

The table here below, explains the meaning of each single option:


Twinax Address 0 to 6
Specify the Twinax address(es) you want to enable and make available for the TCP/IP Clients.
Twinax Mode
Specify the Twinax protocol you want to use. You have 4 options available:

- Standard = This is the Standard Twinax Protocol.
- OBS = This is the compressed Standard Twinax Protocol (available only with AS/400 systems with OS/400 V3R7 or higher).
- 2Mbps = This is the new Twinax protocol, double time faster than Standard Twinax Protocol (available only with AS/400 Systems with OS/400 V3R7 or higher).
- OBS + 2Mbps = This in the new Twinax Protocol, four time faster than the Standard Twinax protocol (available only with AS/400 Systems with OS/400 V3R7 or higher).
TwiNet Port
Specify the TwiNet Port value to be used. The factory default is 1492.


Back to Top


5250 Parallel Port Configuration

This section allows you to set all the configuration parameters for the TwiNet Printer Parallel Port when used to connect a Printer for Host and LAN print jobs.
To access to this section, click on 5250 Parallel Port Configuration link in the Home Page.
The table here below, explains the meaning of each single option:


Printer Session Enable
Specify the way you want to have the Printer Parallel Port enabled. The available options are:
- Disable = disable the Printer Parallel Port.
- Poweron = Enable the Printer Parallel Port at Power On.
- Manual = Enable the Printer Parallel Port manually.
Printer Twinax Address
Specify the Twinax address associated to the Printer Parallel Port. The specified Twinax address must be enabled in the Twinax Configuration Parameters section.
IBM Printer Emulation
Specify the IBM Printer Emulation to be used.
Output Printer
Specify the ASCII protocol used to drive the connected Printer. The same ASCII protocol must be supported (and activated) by the connected Printer.
Code Page
Specify the Code Page for the language to be used. The Code Page must match your IBM system configuration to obtain the correct language specific characters.
Default Orientation
Specify the Default paper orientation if not specify by the application program. The available options are:
- Portrait = The printout will be always portrait.
- Landscape = The printout will be always landscape.
- COR = Computer Output Reduction - is a feature intended for printing 132 (or more) column listings on page printers. The printout is in landscape orientation with reduced vertical and horizontal spacing accordingly to the below table.
CPI Host
CPI Printer
10 CPI
13,3 CPI
12 CPI
15 CPI
15 CPI
20 CPI
17 CPI
27 CPI
For Matrix printer this option MUST be set to Portrait.
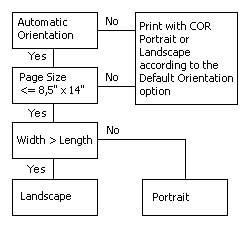
Automatic Page Orientation
This option determine whether an "Automatic Page Orientation" operation must be executed. The page orientation is determined by the settings of  the Default Orientation option, according to this illustration:

For Matrix printer this option MUST be set to OFF.
COR Line Spacing Reduction
Specify the compression percentage of the vertical line spacing to fit all the lines into the page. The default value is 67%.
HPT Leading Sequence
Specify the Leading Key-Code to be used for the Hex Pass-Through feature.
HPT Trailing Sequence
Specify the Trailing Key-Code to be used for the Hex Pass-Through feature.
HPT Mode
Specify the way the HPT Key-Code digits will be handle. the available option are:
No space No Column counter = No action taken (Default)
Update only Column counter = The column counter will be updated and no spaces will be printed.
Print spaces No Column counter = Empty spaces will be printed but the column counter will be not updated.
Print spaces Update Column counter = Empty spaces will be printed and the column counter will be updated.
Override CPI
Specify whether a fix CPI value will be used for all print jobs.
Override LPI
Specify whether a fix LPI value will be used for all print jobs.
Override Print Quality
Specify the Print Quality type will be used for all print jobs.
For Matrix Printer, Draft is recommended.

Back to Top